
# Context
The Context is an object typically created when your app starts, for every requests made to your server, or individual actions run in your app. Its purpose is to hold useful properties like the database driver you use or information about the currently logged in user.
The Nodepack Context system is designed to be very flexible and extensible with a hook interface. Your code and Nodepack plugins can hook into the context to execute logic automatically or add new properties to the context object. For example, the @nodepack/plugin-db-knex plugin will automatically load your config/db.js file and add a Knex connection to context.db.
You can use the context in both apps, Nodepack plugins or even external code. For example, migrations applied by plugins can use the context.db Knex connection setup by the @nodepack/plugin-db-knex plugin to execute Database queries.
# Create a context
When you call the bootstrap method from @nodepack/app, a context will automatically be created and all the 'create' hooks applied. Here is an example entry point for your project:
// src/index.js

import { bootstrap, printReady } from '@nodepack/app'

bootstrap((context) => {
  console.log(`Welcome to your new nodepack-powered app!`)
  console.log(`Getting started: https://nodepackjs.com/guide`)
  printReady()
})
# Manual creation
To manually create a context, use createContext from the @nodepack/app-context package. Note that it will automatically dispatch the create hook.
import { createContext } from '@nodepack/app-context'

async function main () {
  const context = await createContext()
  console.log(context)
}
# Configurations
When a context is created, Nodepack will automatically load and put all your project configuration in the context.config property.
For example, if you create a config/db.js file in your project like this:
// config/db.js

export default {
  client: 'mysql'
}
You will be able to access it with context.config.db, for example:
// src/index.js

import { bootstrap } from '@nodepack/app'

bootstrap((context) => {
  console.log('DB client:', context.config.db.client)
})
# Hooks
Hooks are events executing logic. All functions registered to a specific hook will be executed when the hook is called.
Use the hook method to register a hook into the context:
import { hook } from '@nodepack/app-context'

hook('create', async (context) => {
  context.user = await loginUser(context)
})
You can also use the onCreate method for the 'create' hook:
import { onCreate } from '@nodepack/app-context'

onCreate(async (context) => {
  context.user = await loginUser(context)
})
# Standard hooks
create: dispatched when a Context is created.bootstrap: the context has been created when callingbootstrap()from@nodepack/app. Dispatched after the context creation and before thebootstrap()callback is called.printReady: dispatched when theprintReady()method from@nodepack/appis called. Use to display usefull information when the app is started, such as listening network URLs.destroy: dispatched when thedestroy()method from@nodepack/appis called. Use to teardown active handlers such as file watchers or network connnections (for example a DB driver).
# Context files
In your project, you can create files in the src/context folder. They will be automatically loaded into your app, so it's a good place to hook into the context. For example, let's add an instance of Octokit to consume the GitHub API:
// src/context/github.js

import { onCreate, addProp } from '@nodepack/app-context'
import Octokit from '@octokit/rest'

onCreate (context => {
  addProp(context, 'github', () => new Octokit(context.config.github))
})
Most of the time, you should use addProp to create a lazy property on the context to improve performance. It will call the init function only once ever only if the property is accessed. If you need a fresh value for each new context, use a simple assignment instead:
// Only if we need a fresh value for each context
context.github = new Octokit(context.config.github)
Don't forget to create the related configuration too!
// config/github.js

/** @type {import('@octokit/rest').Options} */
export default{
  auth: process.env.GITHUB_AUTH,
}
Then you can use context.github in any Context scope:
// src/index.js

import { bootstrap } from '@nodepack/app'

bootstrap(async (context) => {
  const { data } = await ctx.github.repos.getReadme({
    owner: 'Akryum',
    repo: 'nodepack',
    headers: {
      accept: 'application/vnd.github.3.html',
    },
  })
  console.log('Readme:', data)
})
If you are using Typescript, you can also export by defaut an interface describing the properties you are adding to the context:
// src/context/github.ts

import { onCreate, addProp } from '@nodepack/app-context'
import Octokit from '@octokit/rest'
import Context from '@context'

onCreate ((context: Context) => {
  addProp(context, 'github', () => new Octokit(context.config.github))
})

export default interface GitHubContext {
  github: Octokit
}
That way, Nodepack will automatically add the GitHubContext interface to the Context type, just like for plugins (see Context type).
# Call a hook
Use the callHook method to manually call a hook:
import { callHook } from '@nodepack/app-context'

async function main () {
  // ...
  await callHook('loggedIn', context)
}
All async hook callbacks will be automatically awaited sequentially by order of registration.
# Context type
If you have @nodepack/plugin-typescript installed in your project, types for your context objects will be automatically generated in the src/generated folder of your project. This affects configurations, Nodepack plugins and context files.
You can use the @context path alias to directly use this type anywhere in your source files:
import { bootstrap, printReady } from '@nodepack/app'
import Context from '@context'

bootstrap((ctx: Context) => {
  console.log(`Welcome to your new nodepack-powered app!`)
  console.log(`Getting started: https://nodepackjs.com/guide`)
  printReady()
})
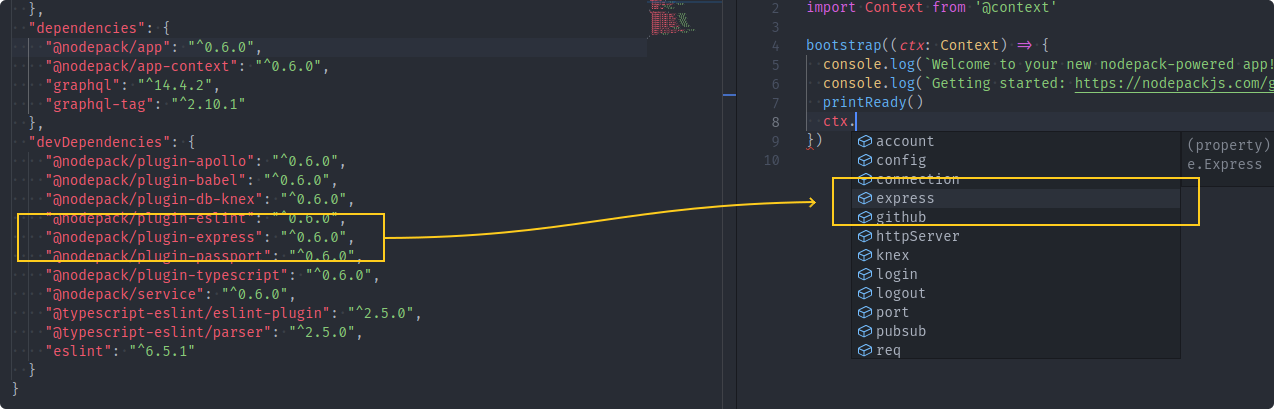
For example, if the Express plugin adds the express property on the context, Nodepack will generate types similar to this:
// In the Express plugin:
// @nodepack/plugin-express/src/context.d.ts

import Express from 'express'

interface ExpressContext {
  express: Express
}

// In your project generated file:
// src/generated/context.d.ts

interface BaseContext {
  config: Config
}

export default type Context = BaseContext & ExpressContext
It will also automatically generate types for the config folder. For example if you create a config/db.ts file:
// config/db.ts
import { Config } from 'knex'

export default {
  client: 'mysql',
  connection: {
    host: '127.0.0.1',
    user: 'your_database_user',
    password: 'your_database_password',
    database: 'myapp_test',
  },
} as Config
Node will generate types similar to this:
// src/generated/config.d.ts
import ConfigDb from '@config/db'

export default interface BaseConfig {
  db: typeof ConfigDb
}
Then context.config.db will be strictly typed with the Knex config interface:
import { bootstrap } from '@nodepack/app'
import Context from '@context'

bootstrap((ctx: Context) => {
  console.log('DB client:', ctx.config.db.client)
})
Here is another example project with a bunch of Nodepack plugins installed. You can see on the right the IDE auto-completion using the automatic types for the Express plugin:
# Usage outside of app
You can directly load the context built fragment of the project:
const { createContext, hook, callHook } = require('my-project/dist/context')